
TippyTalk Manager Guide
What is TippyTalk?
TippyTalk is an easy-to-use AAC communication solution for non-verbal or speech impaired users. People who cannot speak or need help being understood will be able to communicate instantly with anyone, anywhere, anytime.
These TippyTalkers will enjoy the freedom and pleasures of communication with an easy-to-use app on an iPad. TippyTalkers message invited members of their Community. This creates a private social network for the TippyTalker. The TippyTalk Manager will invite Community Members as well as customize the app experience for the TippyTalker.
Some TippyTalk configurations set up by institutions such as schools and therapy centers will have an additional layer of organization. These configurations will include a Community Owner and Administrators. For details on this type of TippyTalk configuration, refer to the TippyTalk Knowledge Base.
First Steps
Install the TippyTalker app if needed. Here’s how:
On the TippyTalker iPad, verify the TippyTalker app has been installed.
If the TippyTalker app is installed, continue to step 2.
If the TippyTalker app has not been installed, download it from the App Store and install it.
Install the TippyTalk Community app. Here’s how:
On the manager device, go to the App Store or Google Play.
Download the free TippyTalk Community app on your Phone or Tablet. Note: The TippyTalk Community app is free, if you are asked to make a purchase you have downloaded the wrong app.
Setting up the TippyTalk Manager account
Ensure that you have downloaded the TippyTalk Community app on your device (smartphone or tablet).
You will have received an invitation by email. Open this email invitation on the same device you will use to manage TippyTalker.
Follow the link.
Complete registration by following the prompts (add your name, password with minimum six characters with at least one number or special symbol, and portrait/selfie)
Result: you are logged in to the app and are ready to use it. You can chat with the TippyTalker and they can respond.
Setting up the TippyTalker account profile
Open the TippyTalk Community app on your device (smartphone or tablet).
Select the add a person icon.
Add the name of the TippyTalker.
Add a portrait/selfie of the TippyTalker.
Set a PIN (to access settings on the TippyTalker iPad)
Select save.
Result: The TippyTalker account profile is created.
Create log in
You will need to have both apps installed to create the TippyTalker account login. Tip: Place both devices side by side on a table and open the apps on each device.
Open the TippyTalk Community app on your Manager device (smartphone or tablet).
Open the TippyTalker app on the iPad.
In the Community app on the Manager device:
Tap on the TippyTalker’s image or the info icon next to it to access Manager options.
Select the QR code feature. The log in ID will automatically generate.
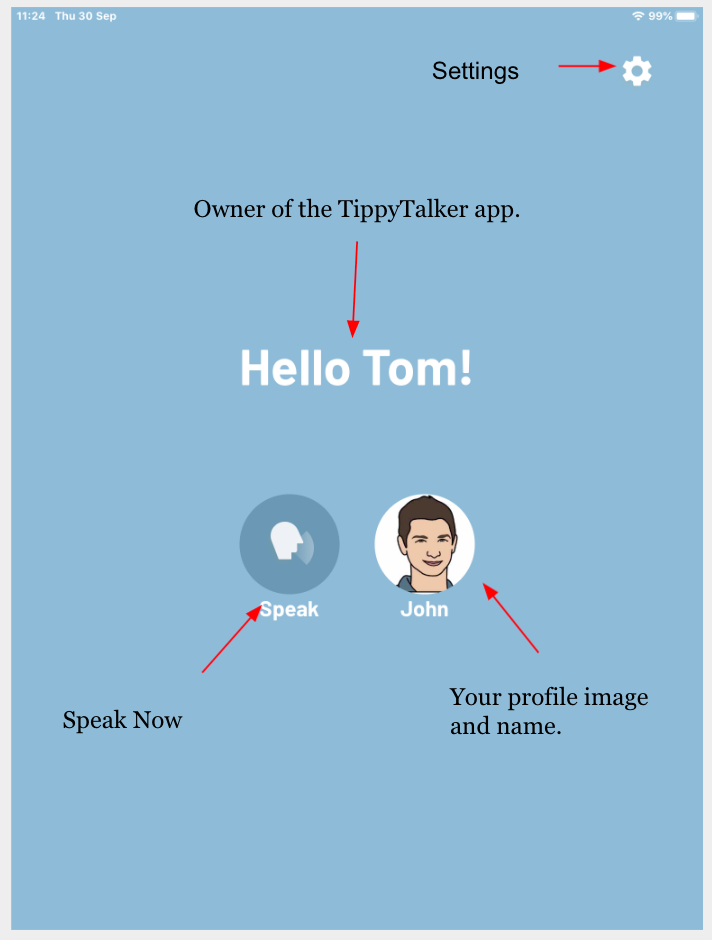
You will see your TippyTalk Community home screen (image below).
In the TippyTalker app on the iPad:
Enter PIN.
Select log in.
Click to scan the QR code.
The TippyTalker home screen appears.
For details on using the TippyTalker app on the iPad, refer to the TippyTalk Knowledge Base document Guide to the TippyTalker app.
Send messages to your TippyTalker
On your device, open the TippyTalker Community app.
Click on the TippyTalker’s portrait/selfie.
Compose your message. It may be:
Text, which will be automatically read aloud to your TippyTalker.
Recorded audio file
Video
Image
Customize TippyTalker: Change background color (also see image below)
Note: Although most customization occurs from the Manager’s device, this feature is customized on the TippyTalker’s device.
On the iPad, open the TippyTalker app.
Select settings (gear icon).
Select themes.
Select color.

Customize TippyTalker: Managing Community
The TippyTalk Manager organizes the Community for the TippyTalker. The Manager may invite or remove Community Members, who are those who will be permitted to talk with the TippyTalker using the TippyTalk Community app.
Community Members might be family, friends, teachers, therapists, or any person the Manager chooses to invite.
To create a Community:
On the Manager device (smartphone or tablet), open the TippyTalk Community app.
Select the TippyTalker.
You’ll be navigated to the empty messaging screen with the TippyTalker portrait/selfie at the top.
Tap on the image (iOS) or the info icon (Android) to access options.
Select Manage Community.
Invite new people to the community with different roles (Admin, Community Manager, Member).
Result: new people will be invited to the community. When they accept the invitation and complete registration, they will be able to begin communicating with your TippyTalker.
Customize TippyTalker: Managing Library Images
The TippyTalk Manager may choose to customize Library images for the TippyTalker. The Library has more than 40,000 available images. The Manager may also add images and photographs to the Library.
Images are organized into folders and cards. When the TippyTalker composes a message, they will select a folder (for example: the image for “I need”) first then complete the message with a card (for example: the image of a blanket).
The message is translated to text (“I need a blanket.”) and sent to the Community Member.
TippyTalker is set up with a starter set of folders and cards.
For the best TippyTalk experience, the Manager will make available only the images that are most helpful for the TippyTalker. The Manager will also add personal images.
To manage library images:
On the Manager device (smartphone or tablet), open the TippyTalk Community app.
Select the TippyTalker. You’ll be navigated to the empty message window with the TippyTalker image at the top.
Tap on the image (iOS) or the info icon next to it (Android) to access options.
Select Manage Folders option to access the list of default folders with cards.
Create new folders and/or add more item cards to existing folders. The Manager may also remove or rearrange folders.
Result: Folders and cards in the TippyTalker app will be automatically updated.